The objective of this tutorial is to learn how to use the DHT22 sensor with Arduino uno. The room temperature and humidity will be printed to serial monitor and also will be displayed to the LCD 4×20 in Proteus ISIS.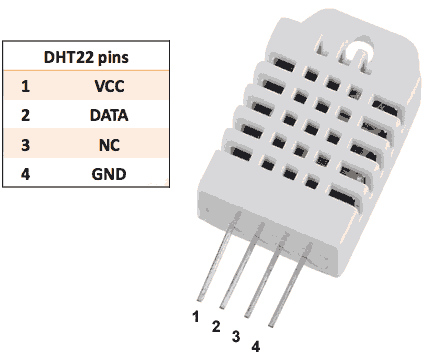
DHT22 is simple basic, cheap digital temperature and humidity sensor. It uses a capacitive humidity sensor and a thermistor to measure the surrounding air, and spits out a digital signal on the data pin. Connections are simple, the first pin on the left to 3-5V power, the second pin to your data input pin and the right most pin to ground. You can download DHT22 specification file from this link
Features:
Power: 3.3-6V DC
Output signal:digital signal via single-bus
Max Current: 2.5mA
Humidity: 0-100%, 2-5% accuracy
Temperature: -40 to 80°C, ±0.5°C accuracy.
Hardware Required:
1x Arduino UNO R3
1x LCD 4×20
1x DHT22 Sensor
1x Potentiometer
2x Resistors 4.7K
1x Button for RESET
1x BreadBoard
14x Jumper Wires.
Software Developmen :
The code developed for the ARDUINO UNO R3 is written in the C language. The compiler used to write the C code is Arduino IDE (1.8.0). After the c code is successfully compiled, a HEX file is generated.
Temperature and Humidity monitoring with DHT22 sensor Arduino Uno R3 (Code)
#include "DHT.h"
#include
#define DHTPIN 7
#define DHTTYPE DHT22 // DHT22
// initialize the library with the numbers of the interface pins
// lcd(RS, E, d4, d5, d6, d7)
LiquidCrystal lcd(12, 11, 5, 4, 3, 2);
DHT dht(DHTPIN, DHTTYPE);
const char DEGREE_SYMBOL = 167; //167 is the ASCII code for the degree symbol
// Array symbol degree
byte level [8] = {B00001100,
B00010010,
B00010010,
B00001100,
B00000000,
B00000000,
B00000000,
B00000000,
};
//
void setup() {
Serial.begin(9600);
Serial.println("Temperature and Humidity monitoring with DHT22");
// set up the LCD's number of columns and rows:
//lcd.begin(numCols, numRows);
// Initialize the display
lcd.begin (20, 4);
lcd.clear ();
// Information on the initial display
lcd.setCursor (1, 0);
lcd.print ("LET'S THINK BINARY");
lcd.setCursor (0,1);
lcd.print ("www.electronify.org");
lcd.setCursor (0,2);
lcd.print ("Temperature: ");
lcd.setCursor (17,2);//18
// Shows the symbol of the degree
lcd.print(" \xDF" "C");
lcd.setCursor (0,3);
lcd.print ("Humidity: ");
lcd.setCursor (19,3);
lcd.print ("%");
Serial.begin (9600);
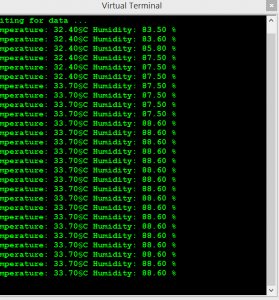
Serial.println ("Waiting for data ...");
// Starts DHT sensor
dht.begin ();
}
void loop() {
// Moisture reading
float h = dht.readHumidity();
// Reading of temperature (Celsius)
float t = dht.readTemperature();
// Check if the sensor is responding
if (isnan(t) || isnan(h)) {
Serial.println("Failed to read from DHT");
} else {
// Display the temperature in the serial monitor
Serial.print ("Temperature: ");
Serial.print (t);
// Display the temperature in the LCD
lcd.setCursor (13,2);
lcd.print (t);
Serial.write(DEGREE_SYMBOL);
Serial.print("C" );
// Show the moisture in the serial monitor
Serial.print (" Humidity: ");
Serial.print (h);
Serial.println (" %");
// Display the humidity in the LCD 4X20
lcd.setCursor (13,3);
lcd.print (h);
// Wait 2 seconds between the measurements
delay (2000);
}
}
Temperature and Humidity monitoring with DHT22 sensor Arduino Uno R3 (Schematic Diagram)
Results:
Compile the PIC code and get the hex file from it. For simulating with PROTEUS ISIS hit run button and then you will get above output.