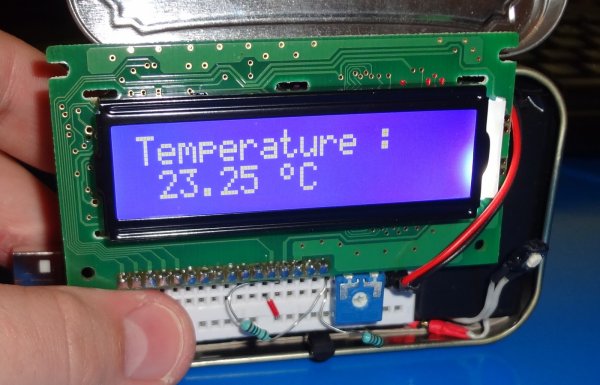
This arduino projects show how to read Celsius and Fahrenheit temperature with LM35 temperature sensor.
Parts List;
1) 1x 16×2 parallel LCD display (compatible with Hitachi HD44780 driver)
2) 1x Arduino
3) 1x 10kΩ potentiometer
4) 1x LM35 temperature sensor
5) Jumper wire
 Instruction;
1) Connect all jumper wire as shown in diagram.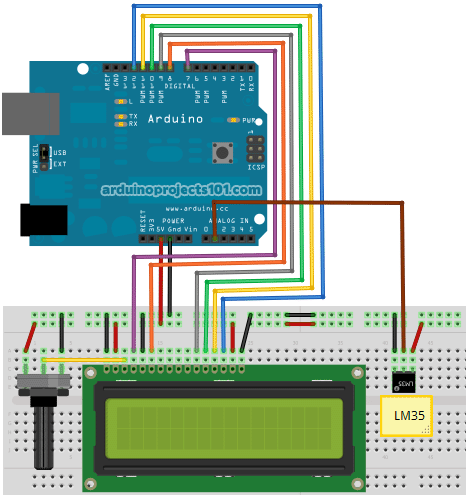
2) Connect LM35 center lead to analog pin 1, make sure ground lead connected to ground and Vs lead to 5V pin.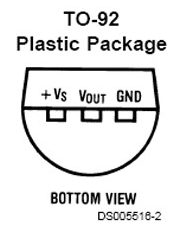
Upload this code to your arduino
/*
  Temperature Sensor
  Reading temperature with LM35 sensor.

  Coded by: arduinoprojects101.com
*/

// include the library code:
#include <LiquidCrystal.h>

// initialize the library with the numbers of the interface pins
LiquidCrystal lcd(7, 8, 9, 10, 11, 12);

//declare variables
float tempC;
float tempF;
int tempPin = 1;

void setup(){
  // set up the LCD's number of columns and rows:
  lcd.begin(16, 2);
  lcd.print("Temp1=");
  lcd.setCursor(0, 1);
  lcd.print("Temp2=");
}

void loop(){
  tempC = analogRead(tempPin);           //read the value from the sensor
  tempC = (5.0 * tempC * 100.0)/1024.0;  //convert the analog data to temperature
  tempF = ((tempC*9)/5) + 32;            //convert celcius to farenheit

  // print result to lcd display
  lcd.setCursor(6, 0);
  lcd.print(tempC,1);
  lcd.print("'C");

  lcd.setCursor(6, 1);
  lcd.print(tempF,1);
  lcd.print("'F");

  // sleep...
  delay(1000);
}
lcd.print(“Temp1=”);
print temperature label.
lcd.setCursor(0, 1);
lcd.print(“Temp2=”);
print temperature label, start print at column 0, second line (0=1st line, 1=2nd line)
Read more: Arduino Temperature Sensor Code