A device which collects data (environmental, soil and photosynthesis values) of plant(s) and then stores/analyze using a MKR1000 and Azure.
Things used in this project
Hardware components |
||||||
 |
|
× | 1 | |||
|
× | 1 | ||||
|
× | 1 | ||||
 |
|
× | 1 | |||
 |
|
× | 1 | |||
 |
|
× | 1 | |||
Software apps and online services |
||||||
 |
|
|||||
 |
|
|||||
|
||||||
|
||||||
Story
OVERVIEW
The idea for PlantAnalyzer was formulated as a solution to my wife’s plants, all of which were in the process of dying. Being a maker minded human, I thought it would be nice to know when the plant’s health started to decay, and figured collecting a copious amount of data on our plants would be a good place to start.
PlantAnalyzer utilizes the Arduino MKR1000, Microsoft Azure and Windows Universal App to easily gather, process, and store data to the cloud to be retrieved by a Windows Universal App.
Key feature of PlantAnalyzer v1.0 are:
Environmental Sensors:
- Soil Moisture
- Air Temperature
- Humidity
Near-infrared (infrablue) and Standard 5MP Cameras:
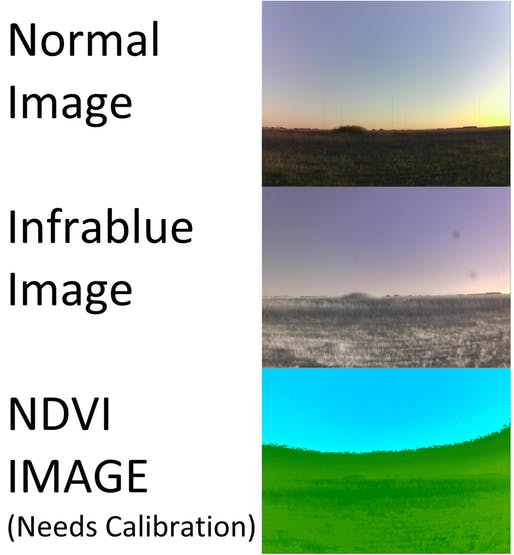
- The PlantAnalyzer is equipped with dual Arducam 5MP camera, one modified to capture near-infrared (infrablue) images and one to capture standard images. The images that the infrablue camera captures contains data that can be used to calculate a plant’s Normalized Difference Vegetation Index (NDVI) value which correlates to how much sunlight a plant is absorbing (photosynthesis!). A full article on NDVI and near-infrared cameras can be found on Public Lab’s website here.
Microsoft Azure Connection:
- Thanks to MKR1000’s built in WIFI, connecting to Microsoft Azure is easy! PlantAnalyzer uses Azure’s Mobile Service to store environmental data and serve the data to a Windows Universal App. Another Azure product used is the WebApp that allows a python Flask App receive and process images using HTTP message from the PlantAnalyzer.
Thank you for taking the time to look at my project. Please feel free to leave a comment (questions, comments, places you see where we can improve upon this project, it’s all welcomed/needed to grow).
HARDWARE / ENCLOSURE
PlantAnalyzer v1.0 is built around the new Arduino MKR1000. This tiny new Arduino packs a punch with built in WIFI and a ATSAMW25 SoC.
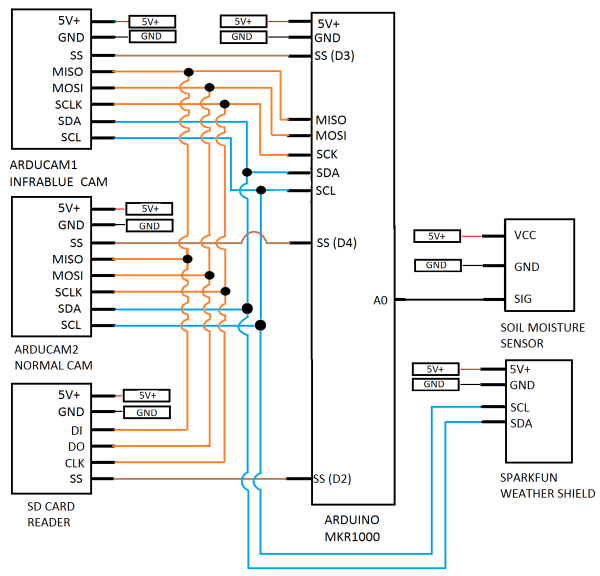
To connect the hardware to the MKR1000, two communication protocols are used: SPI and I2C.
Serial Peripheral Interface (SPI) is used to control both the camera as well as an Adafruit SD card reader. SPI works off of three “control” wires and a slave select that the “MASTER” uses to indicate which “SLAVE” it wants to talk to.
I2C (pronounced I-squared-C) is used to write to the camera’s registries for configuration and also to communicate with SparkFun’s weather shield (currently only used for temperature and humidity). I2C is a two wire protocol that also uses a MASTER/SLAVE relationship, but instead of a slave select, each SLAVE has an address to which the MASTER can “address”.
A wooden enclosure, which features a clear front (to hopefully view roots!) was constructed for this project, but due to the MKR1000 prototype board being irreplaceable I decided against using until I was 100% confident on a waterproof enclosure.
Currently, the PlantAnalyzer is powered off of USB 5V. I plan to upgrade the power to a lithium-ion battery charged using a solar panel. The biggest hindrance for v1.0 was the lack of a 100% waterproof enclosure and lack of knowledge pertaining to writing code focused on power management (I will get there though!).
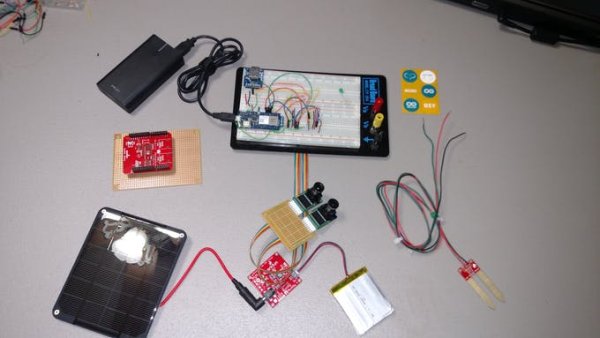
Hardware used for PlantAnalyzer V1.0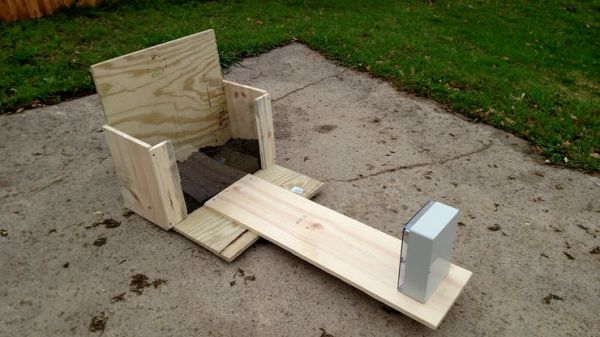
Mock-up Enclosure (Disclosure: I am not YET comfortable enough to place my irreplaceable MKR1000 in a “water proof” enclosure)
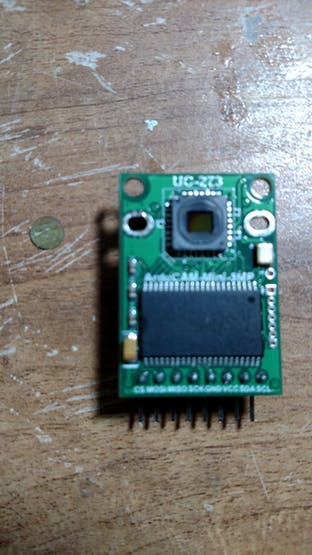
MODIFYING ARDUCAM 5MP OV5642 CAMERA:
In order for the PlantAnalyzer to capture “infrablue” (near-infrared) images, the Arducam 5MP OV5642 camera has to be modified by completing the steps listed below. The Arducam 5MP camera comes stock with an infrared blocking filter as well as a camera IR blocking lens, which would prevent the camera from detecting an IR light. To modify a Arducam 5MP OV5642 camera
- 1) Remove the lens frame from the circuit board and locate and remove the IR filter (round clear plastic like object, shown in picture below)
- 2) Cut a rectangle of Rosco Infrablue #2007 to cover the lens frame
- 3) Reassemble lens frame to Arducam’s circuit board
- 4) Install non-IR blocking lens (The lens I used can be found here)
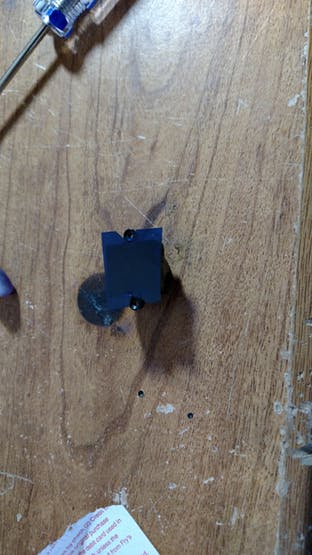 Lens holder with Rosco Infrablue #2007 Filter
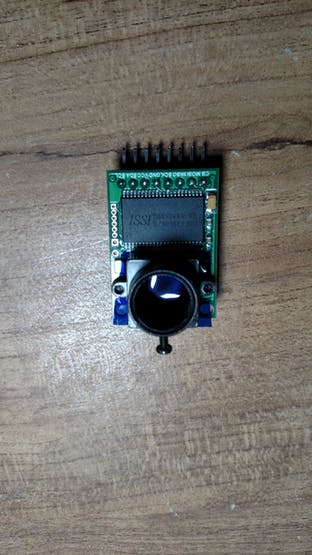

SOFTWARE
PlantAnalyzer utilized three separate set of code:
- Arduino Code – To control the MKR1000
- Azure WebApp – Flask app to handle HTTP POST requests and process infrablue images into NDVI images
- Universal Windows App – Written in C#, is a Graphical User Interface (GUI) to allow the user to control the MRK1000 and view the data being collected
Setting-up SSL Certificates on the MKR1000:
In order for the MKR1000 to properly communicate with Azure, the MRK1000 needed the appropriate SSL certificates. To download the SSL certificates, I used the FirmwareUpdater program found in the WiFi101 Library’s example folder. The FirmwareUpdater example also has a GUI that the user can use easily download and flash the certificates. A detailed explanation can be found here.
Arduino Code
For PlantAnalyzer v1.0, the following Arduino libraries were used:
“Default” Libraries:
- Wire.h – I2C library
- SPI.h – SPI library
- SD.h – Library to manage SD cards
Libraries that need to be downloaded and installed (All can be downloaded from Arduino IDE except for the first two):
- ArduCAM.h – Used to control ArduCAM cameras
- memorysaver.h – Included with ArduCAM’s library, contains registry values for the OV5642 sensor
- WiFi101.h – Manages WiFi configuration and connection
- WiFiUdp.h – Used to send and receive UDP messages
- RTCZero.h – Manages MKR1000’s onboard Real Time Clock
- SparkFunHTU21D.h – Sparkfun’s library for their weather shield
- SparkFunMPL3115A2.h – Sparkfun’s library for their weather shield
- Firmata.h – Manages Firmata protocol which communicates with UWA
Please see the PlantAnalyzerIoT GITHUB found at the bottom of this project for the complete Arduino sketch (Tried to add as many comments as I could, and plan to go back and add more, as well as scrub/optimize code).
Primary Functions in the Arduino sketch:
- Setup( ) – The setup function is used to configure the various communication protocols (SPI, I2C, Serial, and Firmata), the peripherals, and WiFi settings. The Setup function also connects to a Network Time Protocol (NTP) time server to correctly configure the RTC.
- Loop( ) – PlantAnalyzer v1.0 is currently configured to connect to a Universal Windows App. I have added various “IF” statements in the Loop function that are linked to variables that can be changed based on desired function.
- Second_Loop( ) – This function is triggered by the real time clock every day at 1200, or noon. This “second_loop” captures a daily snapshot of the plant, and stores the data on Azure for later analysis.
- capture_***image*** ( ) – There are four separate capture image functions. These functions command the intended camera to capture and store the image (these functions are on my list to consolidate down to ONE function).
Snippets from the Arduino Sketch that I want to highlight are the “send_infrablueImage_azure( )” function and the Firmata sections.
Send Image to Azure (HTTP POST):
In order to send the images taken by PlantAnalyzer to the Azure Web App, I used a HTTP POST request. To have Azure’s Web App accept the POST request, the MKR1000 needs to present its SSL certificate, or else the request will be rejected.
The code below takes the binary information of the image and transfer it using a POST request formatted as follows:
Sample POST request:
POST / HTTP/1.1
HOST: FLASK_HOSTNAME
Content-Type: multipart/form-data; boundary = AaB0x
Content-Length: (length of content)
--AaB03x
Content-Type: image/jpeg
Content-Disposition: form-data; name="file"; filename=imagefilename
Content-Encoding: binary
Binary data of the image!
--AaB03X--
From Arduino Sketch (code omitted to maintain focus on HTTP POST) :
void send_infrablueImage_azure() {
 // Load Infrablue Picture
 while (SD.begin(CS_SD));
 String infrablueFilename = String(table_index) + "BLUE.JPG";
 File infrabluePicture = SD.open(infrablueFilename);

 // Get the size of the image (frame) taken
 while (!infrabluePicture.available());
 long jpglen = infrabluePicture.size();

 // Prepare request
 String start_request = "";
 String end_request = "";

 start_request = start_request + "\n" + "--AaB03x" + "\n" + "Content-Type: image/jpeg" + "\n" + "Content-Disposition: form-data; name=\"file\"; filename=\"" + infrablueFilename + "\"" + "\n" + "Content-Transfer-Encoding: binary" + "\n" + "\n";

 end_request = end_request + "\n" + "--AaB03x--" + "\n";
 long extra_length;
 extra_length = start_request.length() + end_request.length();
 long len = jpglen + extra_length;
 // Connect to the server, change your host address / port
 if (client.connectSSL(flask_hostname, 443)) {
   client.print(F("POST "));
   client.print(F("/"));
   client.println(F(" HTTP/1.1"));
   client.println(F("Host: " + String(flask_hostname)));
   client.println(F("Content-Type: multipart/form-data; boundary=AaB03x"));
   client.print(F("Content-Length: "));
   client.println(len);
   client.print(start_request);
   if (infrabluePicture) {
     int count = 0;
     byte clientBuf[128];
     int clientCount = 0;
     while (infrabluePicture.available()) {
       clientBuf[clientCount] = infrabluePicture.read();
       clientCount++;
       count++;
       if (clientCount > 127) {
         client.write(clientBuf, 128);
         clientCount = 0;
       }
     }
     if (clientCount > 0) client.write(clientBuf, clientCount);
     infrabluePicture.close();
   }
   client.print(end_request);
   client.println();
 }
 else {
   Serial.println(F("Connection failed"));
 }
 //Wait for response
 while (!client.available()) {
   if (!client.connected()) {
     return;
   }
 }
 //Read the response and send to serial
 bool print = true;
 while (client.available()) {
   char c = client.read();
   if (c == '\n')
     print = false;
   if (print)
     Serial.print(c);
 }
 //Close the connection
 client.stop();
}
Firmata on the MKR1000:
The code snippet below outlines how the MKR1000 configures a Firmata steam and then listens for the Universal Windows App connection. After connection, the MKR1000 then waits for the Universal Windows App to send a command.
From Arduino Sketch (code omitted to maintain focus on Firmata) :
#include
WiFi101Stream stream;
...
wifiStatus = stream.begin(ssid, pass, port);
 // FIRMATA SETUP
 Firmata.setFirmwareVersion(FIRMATA_FIRMWARE_MAJOR_VERSION, FIRMATA_FIRMWARE_MINOR_VERSION);
 Firmata.attach(STRING_DATA, stringCallback);

 // start up Network Firmata:
 Firmata.begin(stream);
...
void loop() {
 while(1) {
     while (Firmata.available()) {
       Firmata.processInput();
     }
 }
}
void stringCallback(char *windows_string)
{
 String windows_command =String(windows_string);
 if (windows_command == "take_temp_picture") {
   capture_temp_infrablue_image();
   send_temp_infrablueImage_azure();
 }
}
PLANTFLASK – AZURE WEB APP:
To handle the PlantAnalyzer’s POST requests and process the infrablue images this project utilizes Azure’s Web App, with a python web framework known as Flask. Azure’s Web App feature make designing a web app easy by providing tools such as deployment through GitHub and a Visual Studio Online extension.
In order to calculate and convert the infrablue image, my starting point was a blank Flask Web App on Azure and P-V-O-S’s infrapix-flask project (BIG thanks to P-V-O-S for making their programs free/open).
After creating a blank Flask Web App on Azure, I configured the “Application Settings” to select the python version I wanted to use (went with 2.7).
Next, I created, and activated a python virtual environment on my Web App to handle all the python code. After the python virtual environment was create, I installed the necessary python modules (flask, numpy, matplotlib, and pillow) using the console and PIP install (note: make sure you install through your virtual environment).
Now that the python backend is set up, we can focus on how the Web App handles the POST requests from the MKR1000. Flask has built in request handlers that can be configured to handle requests very easily. The following snippet handles a GET or POST HTTP request sent to the root of the web app, and then processes the message:
From views.py (Code below was modified from the infrapix-flask, modified by myself):
def allowed_file(filename):
   return '.' in filename and \
          filename.rsplit('.', 1)[1] in ALLOWED_EXTENSIONS
def isblue(filename):
   return '.' in filename and \
          'BLUE' in filename.rsplit('.', 1)[0]
def notblue(filename):
   return '.' in filename and \
          'NORM' in filename.rsplit('.', 1)[0]
@app.route('/', methods=['GET', 'POST'])
def upload_file():
   if request.method=='POST':
       file=request.files['file']
       if (file and allowed_file(file.filename) and notblue(file.filename)):
           filename=secure_filename(file.filename)
           uploadFilePath=os.path.join(app.config['UPLOAD_FOLDER'],filename)
           file.save(uploadFilePath)
           img=Image.open(uploadFilePath)
           width,height=img.size
           size=width,height
           return render_template('render.html')
       elif (file and allowed_file(file.filename) and isblue(file.filename)):
           filename=secure_filename(file.filename)
           uploadFilePath=os.path.join(app.config['UPLOAD_FOLDER'],filename)
           file.save(uploadFilePath)
           img=Image.open(uploadFilePath)
           width,height=img.size
           size=width,height
           ndviFilePath=os.path.join(app.config['UPLOAD_FOLDER'],'ndvi_'+filename)
           ndvi(uploadFilePath,ndviFilePath)
           return render_template('render.html')
   return render_template('index.html')
The images are then stored on the Web App in a folder labeled uploads to be used later.
Note: Sample NDVI image shown below is showing plant life in green, however, the camera taking infrablue images NEEDS to be calibrated in order for the NDVI images to help analyze a plant’s health. Researching near-infrared camera, Automatic White Balance (AWB) is very important! Most professional (full feature cameras) have a AWB feature. The ArduCAM does have an AWB feature, however since I modified the module (new lens and BLUE filter) the camera module’s AWB does not work. Using the I2C bus, I should be able to rewrite the camera module’s registers to correct the AWB. Another option is to use both the normal and infrablue images to calculate the NDVI of a plant.
Azure Mobile Service:
To store the environmental data and image URLs I used Azure’s Mobile Service to easily connect and send Azure a POST request containing the data to a SQL database.
The POST request, similar to the POST request used to upload images, looked similar to the below sample:
POST /tables/table_name HTTP/1.1
HOST: mobile_app_name
X-ZUMO-APPLICATION: moible_app_key
Content-Type: application/json
Content-Length: (length of content)
"index":"table_index_var","soilmoisture":"soilmoisture_var","airtemp":"airtemp_var",....
Universal Windows App (Using Firmata):
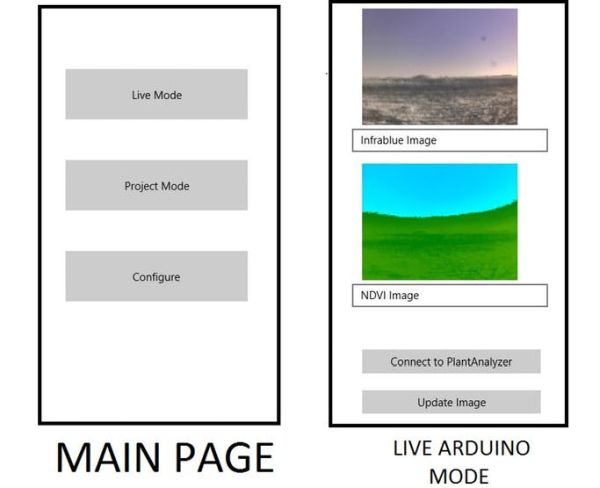
The starting point for the Universal Windows App was a C# Blank App template. This template created a blank page to which I added three more pages to (Live Mode, Project Mode, and Configure). For PlantAnalyzer v1.0, only Live Mode is functional. Live Mode uses the Firmata protocol to connect, and communicate to the MKR1000.
Live Mode Page / FIRMATA:
In live mode, there are two image boxes are linked to constant URLs on the Azure PlantFlask Web App and two buttons.
The “Connect to PlantAnalyzer” button connects the app to the MKR1000 using Firmata. The following code snippet outlines how the app connects to the PlantAnalyzer:
From LiveArduino.xaml.cs (code omitted to maintain focus on Firmata connection) :
using Microsoft.Maker.Serial;
using Microsoft.Maker.RemoteWiring;
using Microsoft.Maker.Firmata;
namespace PlantAnalyzerApp
{
   public sealed partial class LiveArduino : Page
   {
       RemoteDevice mkr1000;
       NetworkSerial wificonnection;
       UwpFirmata mkr1000_firmata;

       private void button_Click(object sender, RoutedEventArgs e)
       {
           // Create Firmata
           this.mkr1000_firmata = new UwpFirmata();
           //Create MKR1000 Device
           mkr1000 = new Microsoft.Maker.RemoteWiring.RemoteDevice(mkr1000_firmata);
           //Establish a network serial connection. Change IP address and port
           wificonnection = new Microsoft.Maker.Serial.NetworkSerial(new Windows.Networking.HostName( IP ), PORT);
           //Attach event handlers
           wificonnection.ConnectionEstablished += NetWorkSerial_ConnectionEstablished;
           wificonnection.ConnectionFailed += NetWorkSerial_ConnectionFailed;
           //Begin Firmata
           mkr1000_firmata.begin(wificonnection);
           //Begin connection
           wificonnection.begin(115200, Microsoft.Maker.Serial.SerialConfig.SERIAL_8N1);
       }
   }
}
NOTE: BE SURE TO ENABLE NETWORK CAPABILITIES IN THE “Package.appxmanifes” FILE.
The other button, “Update Image”, sends a command to the MKR1000 telling it to upload and process a new picture. The following code snippet outlines how the app sends a string to the MKR1000 (after successful UwpFirmata connection is made) :
From LiveArduino.xaml.cs (code omitted to maintain focus on Firmata “sendString”) :
       private void button1_Click(object sender, RoutedEventArgs e)
       {
           mkr1000_firmata.sendString("take_temp_picture");
       }
The next project I plan on working on is a full featured GUI for the PlantAnalyzer System that will utilize a Project Mode and allow configuration of the MKR1000’s functions.
Proposed Design Improvements for v2.0
Calibrated infrablue camera:
- Need to properly calibrate the infrablue camera to accurately obtain a plant’s NDVI. To accomplish this I have found to possible solutions: 1) Auto White Balance (AWB) calibration 2) Use the normal image and a QR barcode to process the image. I found these solutions on the P-V-O-S community pages, and look forward to learning from them.
Code Cleanup:
- Reduce/eliminate redundant methods!
- Instead of building the Arduino Sketch vertically (ONE LONG SKETCH), I want to try and build the code horizontally, adding tabs for primary features
Full Featured GUI:
- Project Mode to track different plants
- Config file to configure variable thresholds
- Email alerts based on configure thresholds (very close to finishing…)
More Sensors!
- In the future I would like to implement a mini weather station that can track all the environmental data that i can. Sensors to track wind speed, rainfall, sunlight, and soil nutrition (nitrogen for example) would help track variables that affect plants health.
PCB:
- One goal is to design and fab a custom PCB to secure the wiring for the PlantAnalyzer
Resources:
P-V-O-S’s Infrapix-Flask Application (For NDVI image processing):
Public Lab Community (HUGE resource for everything Near-Infrared Camera, NDVI, and Science):
Mohan Palanisamy’s blog (HTTP and Firmata posts):
ArduCAM library:
Special thank you to Hackster, Adafruit, Atmel, Arduino, and Microsoft for hosting the “World’s Largest Arduino Maker Challenge” and providing me the opportunity to design/play with the new Arduino MKR1000.
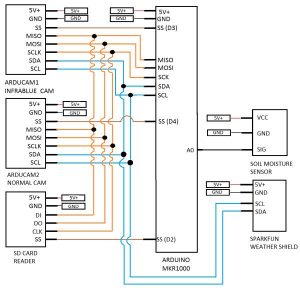
Schematics
Circuit
Read more: PlantAnalyzer