
In this project, we will use a 4Duino and several IR sensors to create a simple pet food dispenser. 4Duino checks whether a food tray contains enough food or not. It is programmed to read IR values from each sensor. These values change depending on the amount of food in the container. The feeding time can be set by the user via the graphical user interface. The device continuously checks the time from an NTP server and updates the display. Once feeding time is reached, the dispenser will automatically release food into the tray if it has insufficient food. The dispensing of food can also be done manually by touching a button from the display.
HOW IT WORKS
COMPONENTS
- 4Duino
- μSD card
- 4 or more IR LEDs
- 4 or more IR Phototransistors
- LM324 OP-AMP
- Potentiometer
- Resistors (220 Ohms and 10 kOhms)
- Servo motor
- μUSB cable
IMPLEMENTATION
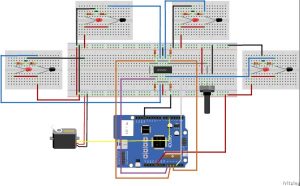
Step 1: Build
Build the circuit as shown in the following diagram and table.
Step 2: Program
Workshop 4 – 4Duino Basic Graphics environment is used to program this project.
This project requires the Arduino IDE to be installed as Workshop calls the Arduino IDE for compiling the
Arduino sketches. The Arduino IDE however is not required to be opened or modified to program the
4Duino.
Open this file using Workshop 4. Note: Download the code here.
Step 3: Compile
Click on the “Compile” button.
Note: This step could be skipped. However, compiling is essential for debugging purposes.
Step 4: Comms Port
Connect the 4Duino to the PC using μUSB cable.
Then navigate to the Comms tab and select the Comms port to which the 4Duino connected.
Step 5: Compile and Upload
Finally, go back to “Home” tab. This time, click on the “Comp’nLoad” button.
The Workshop 4 IDE will prompt you to insert a μSD card to the PC in order to save the widget images.
Insert μSD card, select the appropriate drive and press button “OK”.
Step 6: Insert μSD card
After uploading the program in to the 4Duino, it will try to mount the μSD card. If the μSD card is not present it will prints an error message.
Read more: Pet Food Dispenser featuring 4Duino-24