Hi,
First of all, my English is not perfect =)
I’ve seen many projects with Arduino that describes how to control 2 servo’s with a joystick or use a lcd screen. All of the projects that i have seen are all seperate things. So i decided to make a short Instructable of these things combined. In this instructable is everything you need! Drawings, schematics, pictures and even the Complete Code that i’ve mostly written! This project is made on a breadboard because i just didn’t have the time to make this in a nice shining aluminum box :O

In the picture above you see the camera mounted in two aluminum brackets for the servo’s. I have a instructable for that too!!!
Check it out!
Link: http://www.instructables.com/id/Pan-Tilt-Servo-bracket-controlled-by-Arduino/
So…
Enjoy! =)
Step 1: Parts
Here is a list of all the parts you need.
- Arduino uno / Mega
- Breadboard
- jumper wires
- Joystick
- 20*4 LCD Display
- 2 servo’s
- 10Kohm potentiometer
- NPN transistor (BC547B)
- 6 volt battery or power supply
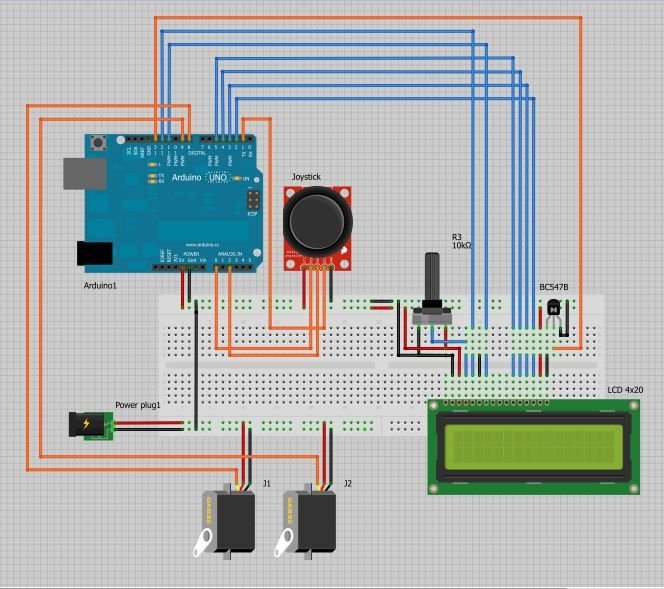
Step 2: Wiring
Hook up all the wires according to the picture.
I’ve made this circuit in Fritzing. It is very easy to use and even has multiple Arduino’s in it. Basic components are all there.
(I wanted to upload my own frtizing file but i could’nt succeed  )
)
You can download Fritzing here: http://fritzing.org/download/
Step 3: Code
Upload the code to the arduino and if everything is connected right the lcd screen will light up!
CODE:
#include <Servo.h>
#include <LiquidCrystal.h>

LiquidCrystal lcd(12,11,5,4,3,2);

const int servo1 = 9;       // first servo
const int servo2 = 8;       // second servo
const int joyH = 0;        // L/R Parallax Thumbstick
const int joyV = 1;        // U/D Parallax Thumbstick

int servoVal;           // variable to read the value from the analog pin

Servo myservo1;  // create servo object to control a servo
Servo myservo2;  // create servo object to control a servo
const int button2Pin = 1;     // the number of the pushbutton pin
const int ledPin =  7;      // the number of the LED pin

// Variables
int ledState = LOW;         // the current state of the output pin
int lastButtonState = LOW;   // the previous reading from the input pin


void setup() {

  // Servo
  myservo1.attach(servo1);  // attaches the servo
  myservo2.attach(servo2);  // attaches the servo

lcd.begin(20, 4);
lcd.clear();


pinMode(button2Pin, INPUT);
  pinMode(ledPin, OUTPUT);

  // Inizialize Serial
  Serial.begin(9600);
}
Read more: Joystick controlled Camera using Arduino