The Candied Dead Baby is an Arduino-controlled interactive halloween decoration. It has been designed, created and assembled by three industrial design engeneering students from Elisava.
 Using servomotors and ultrasonic distance sensors as well as a buzzer, we’ve designed a product that when an ultrasonic sensor catches movement in front of it, activates a servomotor and a buzzer turns on. the project consists on a box that is “full of candy” with a sign that encourages you to get some.
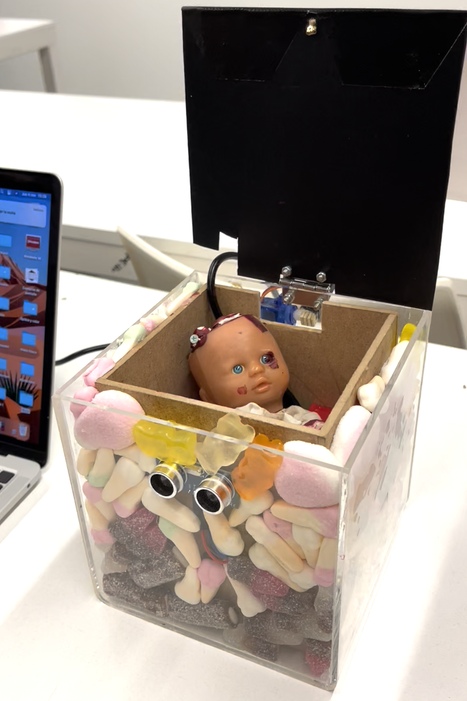
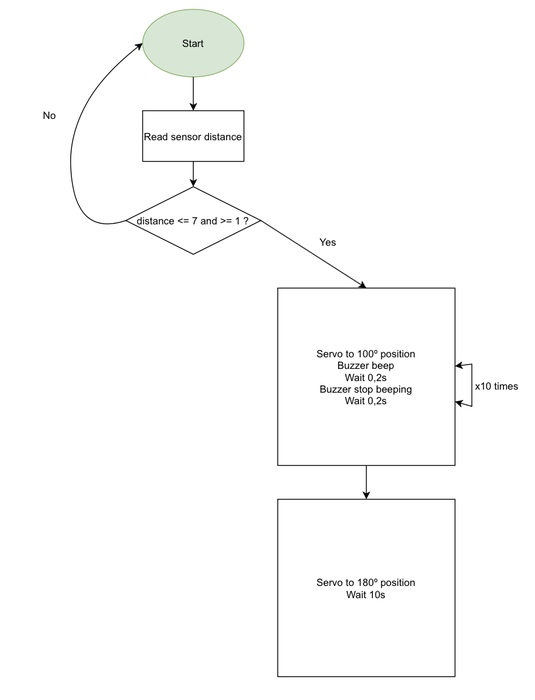
When someone approaches to get some candy, the ultrasonic sensor activates the servomotor and the buzzer. The servomotor opens the box that appears as full of candy, but inside there’s a beheaded baby doll, and at the same time the buzzer starts making a repeatedly uncomfortable noise.
So this is how we achieved this scary experience:
Step 1: Supplies
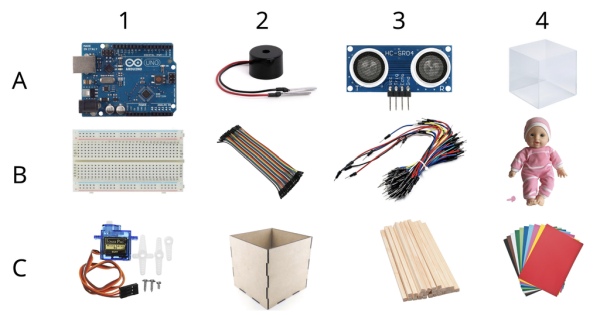 For this project we use as essential elements:
A1 – Arduino Board
A2 – Piezoelectric buzzer
A3 – Ultrasonic sensor
A4 – Clear methacrylate box
B1 – 400 Tie Points BreadBoard
B2 – Female to male Dupont wires
B3 – BreadBoard jumping wires
B4 – Doll
C1 – Servomotor SG90
C2 – Wooden Box
C3 – Wooden stick ( only one )
C4 – CardBoard
The tools we used in the making of the The Candied Dead Baby:
– Insulating Tape
– Arduino Software
– Silicone Gun
– Fake Blood
– Computer
– Scissors
– Clay
– String
– Screws
– Marker Pen
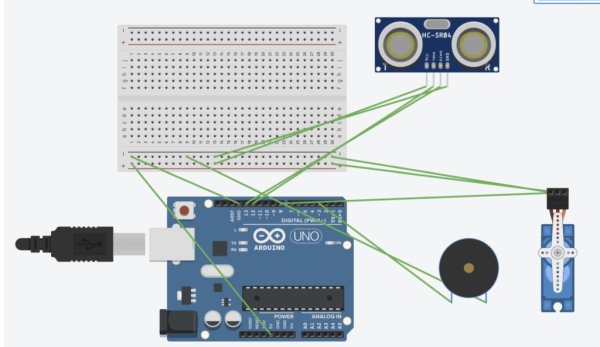
Step 2: Connect the Servomotor, the Piezoelectric Buzzer and the Ultrasonic Sensor
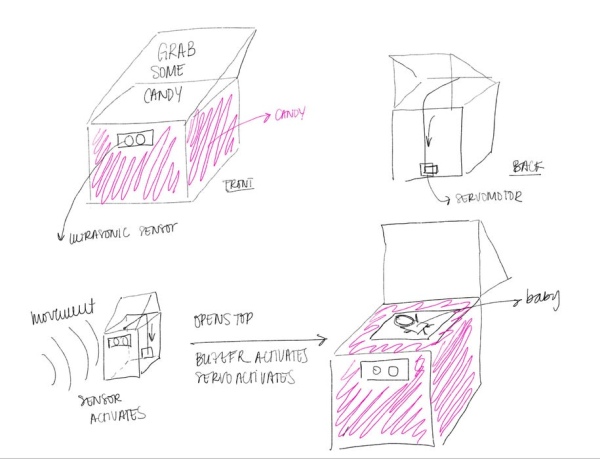
Step 3: Sketch the Prototype
Step 4: Arduino Flowchart
Step 5: Create the Prototype
 Our prototype at this stage consist on a wooden box with a false bottom to put the Tie Points BreadBoard and the Arduino Board, that goes inside the clear methacrylate box. Between these two boxes there’s a space of about 1 cm so we can place the candy to create the illusion of a box full of sweets. We build as well the sign that said ” GRAB SOME CANDY”. On both of the boxes we made all the necessary holes and cuts so the wires could go through and out of them as needed.
We used two pair of screws to attach the top part , made out of cardboard, to the clear box.
Step 6: Attach the Servomotor
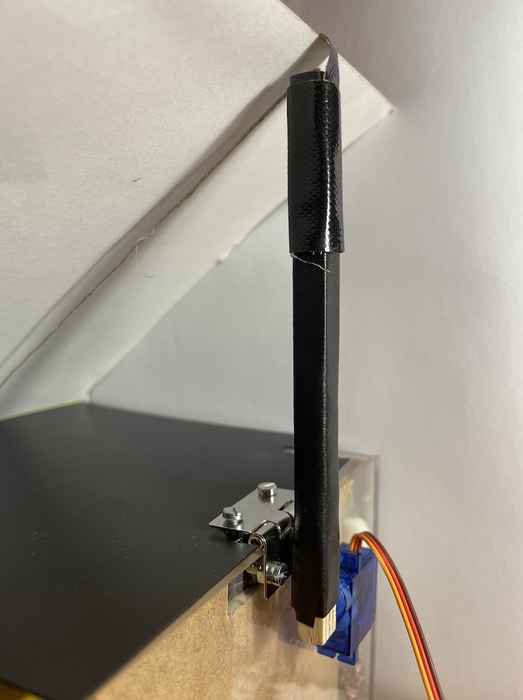 As seen on the pictures this is how we attached the Servomotor to the box. We sticked a Wooden stick to the blade of the Servomotor to increase the strength when it activated. The string that pulled the top was attached form the black cardboard to the highest part of the wooden stick.
Step 7: Incorporate the Electrical Part and the Sensor
 We placed the Tie Points BreadBoard, the Arduino Board and all the wires connected to them on the false bottom. Once al was connected we reenforced the wires so nothing unplugged with insulating tape and redirected the through the holes to attach them to the ServoBoard and the Ultrasonic sensor.
Step 8: Build in the Baby
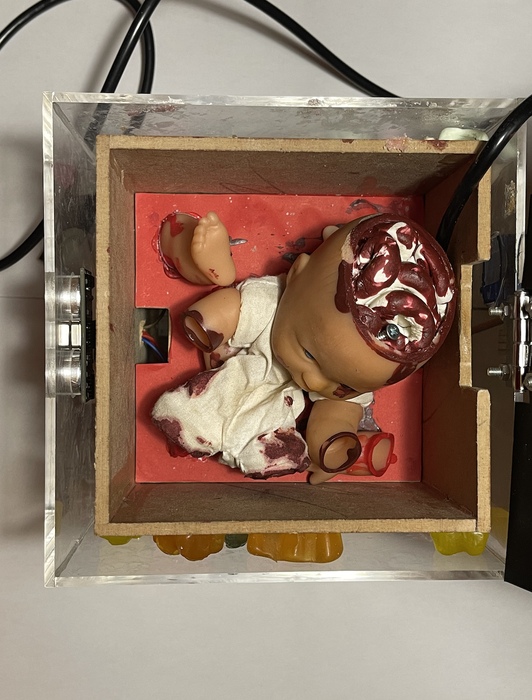 The last part of the creation of the prototype is to place the middle wooden platform that holds the beheaded baby that is revealed when the mechanism is activated
Step 9: Upload Code to Arduino

Step 10: Connect Arduino to Battery or Computer
The last step is to upload to code from the Arduino Software to the Arduino Board, and connect the Board to a power source (9V battery or computer).
To connect it to the computer you will need a USB cable compatible with Arduino.
To connect it to a battery you will need a DC Cable PPBAT Battery Clip and a 9V battery.
Both options are equally valid. In our case we used a computer connected with the USB to Arduino cable.
Read more: HALLOWEEN PROJECT: the Candied Dead Baby