In this project, we will learn how to get started with the ESP8266, an inbuilt 4Duino Wi-Fi module and connect to a local access point. The 4Duino display is used to print the status of the connection for debugging purposes.
UNDERSTANDING THE SOFTWARE
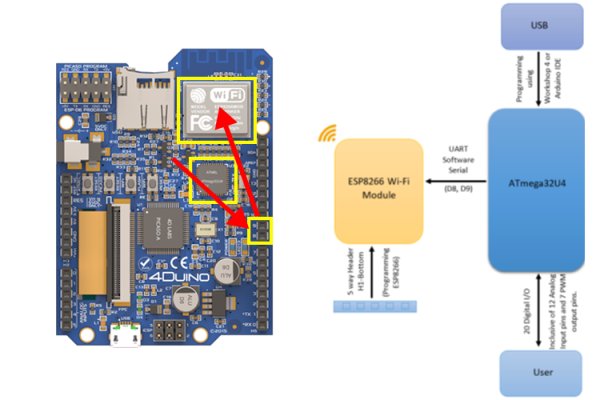
The ESP8266 Wi-Fi Module is embedded in the 4Duino. ATmega32U4 communicates and controls the ESP8266 via Software Serial with a default baud rate of 115200 bps. For this purpose pins D8 and D9 are used. However, if the Wi-Fi modules is used in your project then the pins D8 and D9 cannot be utilised in your design.
Additionally, you can program or upgrade the firmware on the ESP8266 via the 5 way Header. For this you will need a 4D Systems’ programming cable or a PA5 Adaptor. For more information refer to the 4Duino datasheet at www.4duino.com
First step towards programming the ESP8266
The “ESP8266.h” header is incorporated in the skeleton code. This could be downloaded at:
https://github.com/itead/ITEADLIB_Arduino_WeeESP8266
In the skeleton code, there is a section commented to initialise the ESP8266 Wi-Fi Module. All you need to do is uncomment these lines of code and the initialisation is done for you. Now the Wi-Fi modules is ready to be controlled using AT Commands.
The default baud rate is set to 115200 bps, however the maximum baud rate at which Software serial actually works is 19200 bps. So in the code it requires changing the baud rate and this is done for you in the skeleton code.
AT Commands
To communicate to the ESP8266 Wi-Fi module, AT Commands are used. You can use the library mentioned above and use its functions for convenience instead of using AT Commands directly. More information on the library functions can be obtained at:
http://docs.iteadstudio.com/ITEADLIB_Arduino_WeeESP8266/index.html
In this project, the library functions have been utilised to communicate to the ESP8266.
HOW IT WORKS
Firstly, the ESP8266 is set to station mode. This follows the initialization of the Wi-Fi module which is explained above. Setting the Wi-Fi module to station mode allows to connect to an AP. Else it could be set to AP mode or both, meaning it can act as an AP as well as a Station.
Read more: Getting Started with Wi-Fi