Has this ever happened to you? You wake up in the morning and realize that you’re terribly late for work/class/your weekly pedicure/whatever. You throw on a t-shirt and flip flops, sprint around your warm, heated house grabbing your belongings, and race out the door…where you suddenly find yourself surrounded by a cold, biting wind encompassing you in a horrible vortex of snow. You’re completely unprepared for this weather, but it’s too late to go back now. You must suffer through the wintery day, freezing and looking like a crazy person who can’t figure out how to put on a coat.![]()
This instructable will show you how to create your very own CoaTracker, an interactive coat rack that tells you the local weather conditions with a single glance, so you’ll never again be unprepared. The CoaTracker is not only useful, but also an aesthetically pleasing and thoroughly modern addition to your home.
Step 1: What you’ll need
To begin, you’ll need to order an Arduino. LadyAda (www.adafruit.com) has a great starter kit for $65 that will provide you with everything you need to use the Arduino.
You’ll also need to buy:
4 5V Relays (available at RadioShack)
4 3 ft pieces of Electroluminescent Wire, small to medium sized, any color
2 Inverters (you can order the EL Wire and inverters from any EL Wire site, I ordered mine from www.elwirepros.com/)
Now for the construction stuff. You can get creative here, but this is what I used (available at most arts and crafts stores):
1 packet of 4 12″x12″ cork boards
1 flat wooden coat rack with 4 pegs
Now, you should be all set to get started!
Step 2: Software
You’ll need to download a few different kinds of software to run the code:
Arduino software
http://arduino.cc/en/Main/Software
Processing software
http://processing.org/download/
Follow the instructions for your operating system.
After both software’s have been installed successfully, you’ll also need to download Firmata, a standard Arduino firmware that makes it possible to control the Arduino through Processing. Follow all of the instructions here:
http://www.arduino.cc/playground/Interfacing/Processing
Step 3: Code
Attached is the code file that you’ll need to control your CoaTracker. You won’t be able to test it until you’ve set up the arduino, though.
The code is commented so it should be pretty clear. Basically, it takes the weather from an XML feed of your choice (which you can find here: http://www.weather.gov/xml/current_obs/), parses out the weather condition, and uses that condition to light the correct EL wire on the CoaTracker.
The only part you have to change is the URL of the XML feed for your location.
Step 4: The Circuit
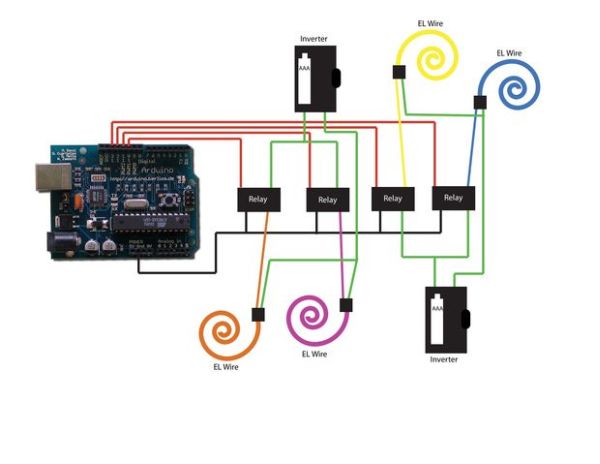
Now you’ll need to connect the EL Wire to your Arduino. Here, you’ll need a lot of wire, plus the Relays and Inverters you bought.
The diagram of the circuit is attached.
Be sure to test all the wires and the code before incorporating them into the coat rack structure. You can do this by attaching the Arduino to your computer with the USB cord it came with. Then press the Play button in the Processing code window to transfer the code to the Arduino.
Step 5: Making the CoaTracker
Okay, this is the creative part. I constructed the CoaTracker structure using cork board and a wooden coat rack I bought at a crafts store. For the background, I created a landscape and sky scene using 2 11″x17″ files in Adobe Illustrator. You can make your own, or use my files which are attached. You’ll need a printer that can print on 11″x17″ paper.
First, paint the wooden coat rack whatever color you choose. I painted mine white.
Next, attach the cork boards to each other, side by side, using staples and tape – or whatever method you like.
Read more: The CoaTracker Using Arduino