I had one remote controlled project that needed an Arduino running 24/7 but I didn’t want to leave my $32 Arduino UNO, so I decided to buy some pieces and created my own Arduino. The most important part was buying the microcontroller. These were my options: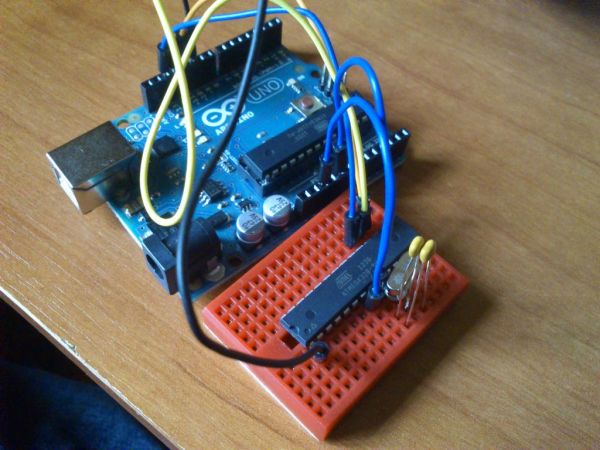
ATMega328P-PU with Optiboot ~ $5.50 (Sparkfun) / $5.19 (Digikey)
ATMega328P-PU ~ $3.16 (Digikey)
ATMega328-PU ~ $2.88 (Digikey)
Obviously I bought the cheaper one, huge mistake. After some research I found that my first option was the straight one. Just plug it as a normal Arduino, the last two needed something else.
The last two options were missing something called a bootloader. A bootloader is “a small program that has been loaded on to the microcontroller. It allows you to upload code without using any additional hardware.”
So first if you were to do anything on those microcontrollers you need a bootloader burned on those chips. As you may have notice, the difference between the second and the third is just a mere P after the 328. This P means pico for picopower which is a technology ATMEL has developed that allows the microcontroller to run with less power.
Well if you see the microcontroller on your Arduino UNO you will find out that it is using the picopower micro, not the normal one. I bought 3 normal ones. OMG then I’m totally screw. Well no, you just have to make a pair of changes on your Arduino files to make it work.
This tutorial will teach you how.
Step 1: Materials
We will need the following materials:
1 USB cable to connect PC-Arduino
1 Arduino UNO (I’m using R1)
1 ATMega328-PU
1 Small breadboard
1 16Mhz Crystal (mine had 20pF of capacitance)
2 22pFCeramic Capacitors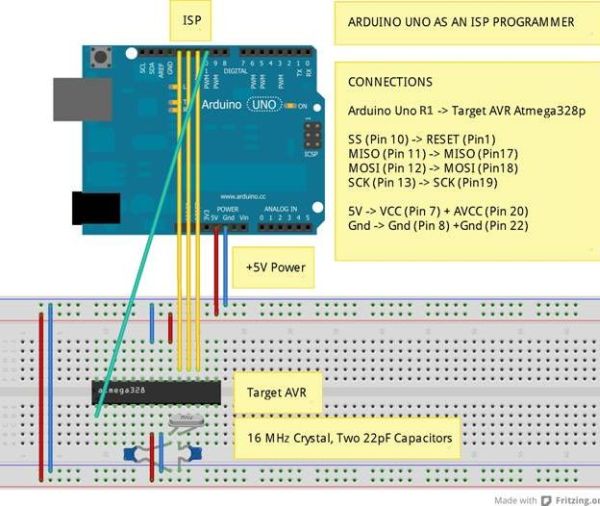
… And some jumper wires
Step 2: Setting your Arduino as ISP
First we need to tell our Arduino UNO (in my case an Arduino UNO R1), to know that whatever we are sending is not for it, but for our other micro. In other words we are making our Arduino a simple transmitter. For this I’m using version 1.0.1 of the Arduino Software (IDE).
1. Plug in your Arduino UNO through USB to your computer. (WITH NOTHING CONNECTED, JUST USB)
2. Open de IDE
3. Open > Examples > ArduinoISP
4. Select Arduino UNO from Tools > Board
5. Select your serial port from Tools > Board (Mine is usually COM3, but it may change.)
6. Upload sketch.
It takes a while. After it finishes, close de IDE and disconnect your Arduino. Now is time to prepare the software and hardware.
Step 3: Preparing the hardware
This is the easy part, just use the diagram to connect every piece.
Step 4: Preparing the Software
Well this is not the easy part, but you just need to follow the instructions carefully. I’ve added 2 files, that you need to replace. Follow the instructions to replace.
0. Make sure your IDE is closed.
1. Make a copy of the complete folder where your IDE is. (I named mine BURN BOOTS)
2. Open the new folder.
3. Navigate to …\arduino-1.0.1 BURN BOOTS\hardware\tools\avr\etc
4. Find a file called avrdude.conf
5. Replace it with the file I attached. (You need to extract it first, Instructables didn’t allow me to send it, so I had to compress it.)
6. Navigate to …\arduino-1.0.1 BURN BOOTS\hardware\arduino
7. Find a file called boards.txt
8. Replace it with the file I attached.
9. Close everything.
Read more: Burning the Bootloader on ATMega328 using Arduino UNO as ISP