If you touch the package, it will scream and run away–changing its course when it strikes an obstacle.
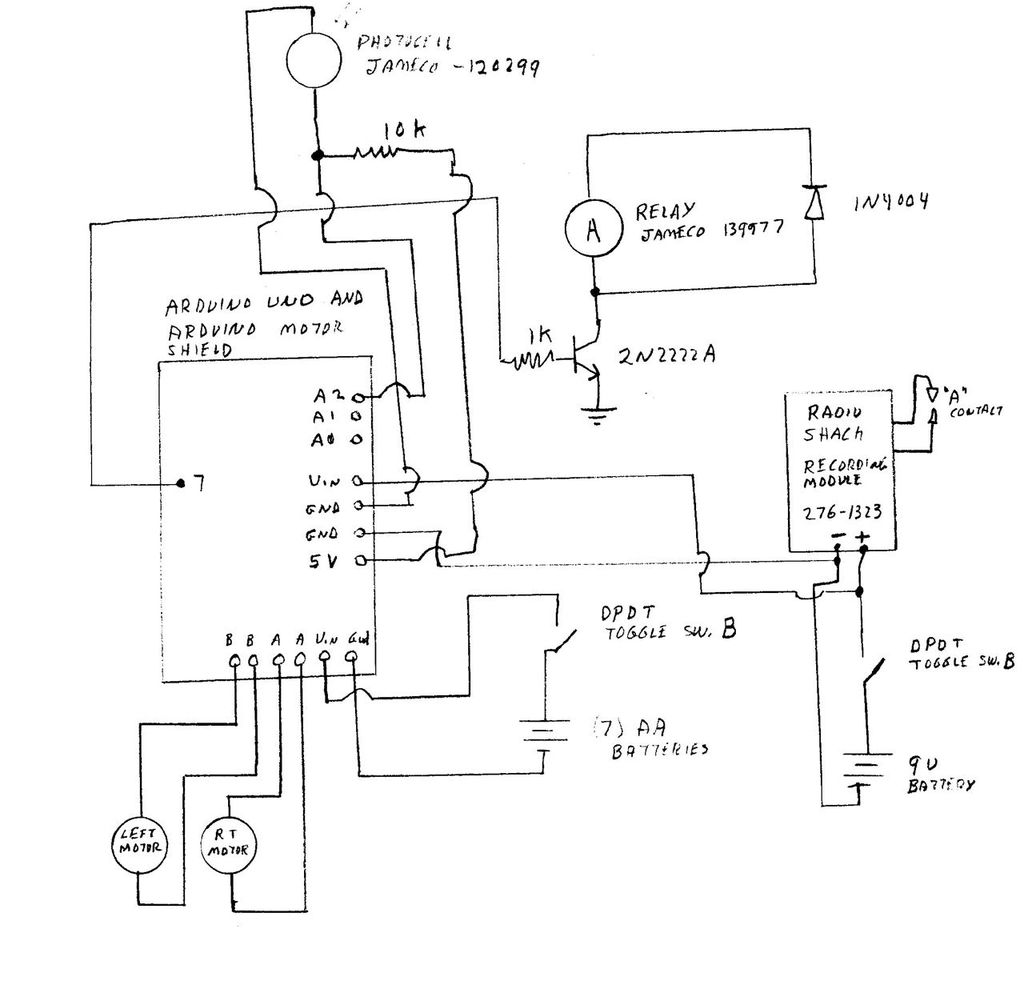
When you lift the gift tag, light strikes a photocell and operation commences. Motors and a sound module are controlled by an Arduino (and Arduino Motor Shield).

Major components required are:
Motorized toy–Kid Galazy Morphibians Rover Remote Control Car; Amazon.com
Arduino Uno
Arduino Motor Shield
Recording Module–Radio Shack 276-1323
Photocell–Jameco 120299
Relay–Jameco 139977
DPDT switch
1K resistor
10K resistor
2n2222a transistor
1n4004 diode
(7) AA batteries
9 V battery
Battery holders
tape, screws, mounting hardware, wire, wire wrap wire, heat shrink tubing, solder
cardboard, wrapping paper
support structure (I printed mine with a 3d printer–it could be made from plywood) http://www.thingiverse.com/thing:38370
Step 1:
In concept, this is fairly simple. Lift the tag and light strikes a photocell–triggering the action. The sound module plays a prerecorded “Eeek” and the package backs up, turns and takes off. The Arduino/Motor Shield monitors current going to the motors. When the package strikes an object, one or both motors struggle to operate and draw an increased amount of current. The increase in current lets the Arduino know it is time to play the “Eeek,” then back up, turn and take off. This continues until the master toggle switch is turned off.
Add “+” from the recording module to the top of the relay/1n4004 diode.
Step 2:
Remove the passenger compartment of the car.
Step 3:
Separate the bottom of the car from the top by removing the screws in the base.
Step 4:
Cut the wires to the receiver module and save the module for a future project.
Step 5:
Drill holes in the battery compartment and bring the motor wires through those holes.
Step 6:
Solder extension wires to the motor wires. I use heat shrinkable tubing to secure the connection.
Read more: Box Scurity Package using Arduino