First things first, we need to build our circuit. This is the easy bit! We’ll be using the Arduino to control a servo that will rotate our sensor around 180 degrees. The Arduino will then send the value from the distance sensor along with the current angle of the servo to the serial port.
Before proceeding please take a moment to check out some of my other work with the SRF-05 and servos if you’re unfamiliar with either.
Arduino SRF-05 Tutorials
Arduino Servo Tutorials
I’m building this with the SRF-05 ultrasonic range finder/ distance sensor, but because this has a fairly wide field of detection it’s not very precise – I think I’ll end up trying a different range finder maybe an IR one as the SRF-05 works best as a static sensor/ detector, anyway…
Arduino Radar Parts list
SRF05 Ultrasonic range finder
Arduino Deumilanove w/ ATMEGA328
Breadboard / Prototyping board
Jumper/ Connector wires
1x Servo (has to need no more than 5v supply)
You’ll also need some way to mount the sensor to the servo.
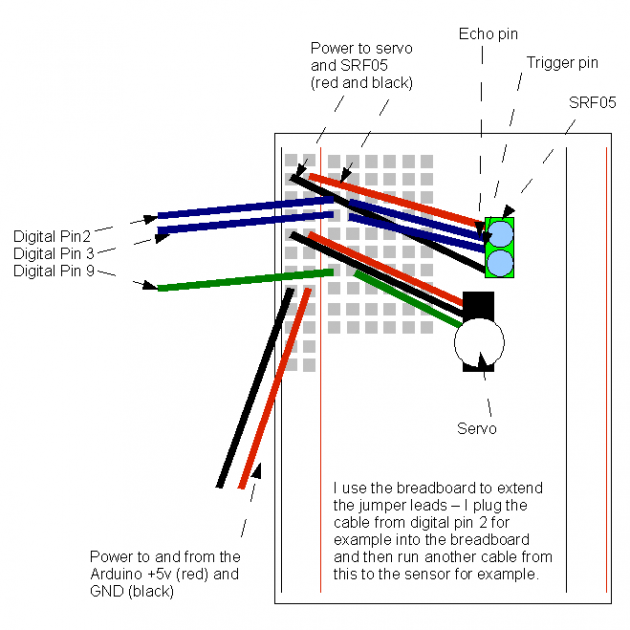
Arduino Radar Servo Circuit
Straight forward, we have the Arduino providing power to the breadboard and we have the servo and the SRF-05 sharing this power. Then we have the servo output pin going to Arduino digital pin 9 and the SRF-05 pins going to digital pin 2 and 3. You’ll notice that in my pictures I have 2 servos – I’m just using the bottom one of the pair to rotate the sensor round. On your servo you’ll need to figure out a way to mount the sensor on to the servo wheel – I used a lot of blu-tac! You’ll also see I’ve mounted my sensor vertically so that the when the servo moves there’ll be less interference with recieving values – placing the sensor horisontally seemed to give differences of up to and sometimes over 5cm between the first and second readings.
My servos do tend to move a bit so I’ve used more blu-tak/ modelling clay to hold them down and in place – if the servos move other than the way they’re meant to then it means dodgy readings.
Arduino SRF05 Radar Sketch
The hardest bit – rotate the servo from left to right, then right to left and for every degree of movement take a series of readings and send them to the serial port. We’ll want to produce an average reading value for consistancy. Unfortunately with this ultrasound sensor we have to be quite slow to make sure we’re getting accurate values and we have to allow time for the signal to come back each time and register in order to produce the average value.
Read more: Arduino + Processing – Make a Radar Screen to Visualise Sensor Data from SRF-05 – Part 1