You know theremins, right? Those cool-looking boxes with antennae that produce noise without being touched? They are played by the likes of Jimmy Page of Led Zeppelin, and present in the soundtracks of countless films. Well, with this instructable, I will show you how to build an approximation of a theremin (in principle, at least) using some basic electronics built on top of an Arduino, which I call a glitchamin. This circuit features adjustable parameters and an optional kill switch, and information on hooking it up to an amplifier for the full-on concert glitchamin experience.
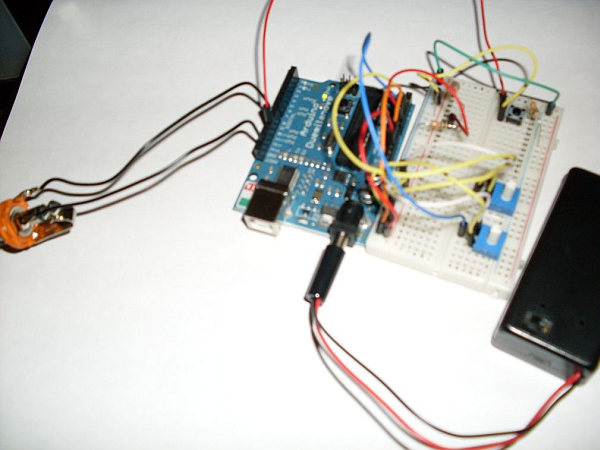
Attach the potentiometers
Take the two potentiometers, and insert them into the breadboard in some convenient location. Then, take some wire, attaching the left lead on each to 5v, the right to gnd, and the middle (wiper) pin to Analog inputs 1 and 2. The pot attached to a1 controls to some extent the pitch by trimming the sample time. The pot attached to a2 controls the decay of the sample by mapping the number of cycles the sample lasts.
Wire in the CdS photoresistor
Next comes the CdS photoresistor. This cool part has a higher resistance when it’s in a dark environment, and a lower resistance when there is light. CdS photoresistors are not polarized, so you can’t put them in wrong, however, they do need an additional resistor to complete the voltage divider.
So, take your CdS cell, and insert it into your breadboard, connecting one lead to 5v, and one to a 10kOhm resistor, connected to gnd. Then connect the middle pin (where the CdS cell and the resistor meet) to Analog input 0 on the Arduino.
Insert the kill switch (optional)
This step is optional. Only follow this step if you want to have a kill switch in your circuit, which cuts off the sound output to the piezo (or mono jack) while it’s pressed. I like to include these in all of my instruments and synths, because I like to do sudden changes and the stutter effect that having a kill switch allows.
If you wish to install a kill switch, insert your push button into your breadboard, minding orientation to ensure that you don’t short the kill pin. You want to attach it so that attached leads are in the same rail, and unattached leads are in separate rails. Attach one lead to Digital pin 10, and the attached lead to gnd through a 10kOhm resistor. Attach one of the other leads to 5v. This button will read LOW while open, and HIGH while pressed.
Insert the Piezo (or Mono Jack)
You have another option this step. You can either install a piezo buzzer for a standalone system, or a 1/4″ mono jack to allow for amplification. The process for either is simple, though. For a piezo setup simply insert the positive (red, on most buzzers) lead into Digital pin 9 on the Arduino, and the other lead to gnd. For the mono jack setup, you need to solder some leads onto the jack, and then connect the tip to d9, and the barrel to gnd. Regardless of either setup, you are now done with the building of the circuit.