How to make small Weather Cube using the D1 mini(ESP8266) connected to your home WiFi, so you can see its output anywhere as long as you have Internet connection. Overall, this project is not very difficult to build and not too heavy with resources, so it will be perfect like your first IoT project.
Steps to Make Pocket Size IoT Weather Station
Step 1: Required Resources
This project is very easy to build and does not require many components. Here is the list of parts:
Electronic Components Required:
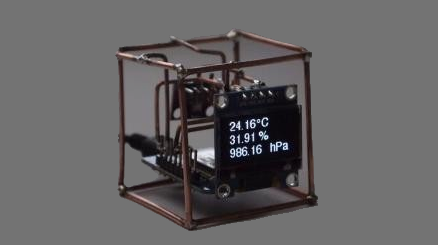
- I2C OLED Display(128×64)
- WeMos D1mini
- BME280
- 1.5mm Brass Rod or Iron Rod
Tools Required for testing the circuit:
- Jumper wires
- Breadboard
- USB wire – Micro USB Type B to A
Required Tools:
- Bench vice – not compulsory
- Small hammer – not compulsory
- Soldering iron
Step 2: Prototyping on Breadboard
Put all components on the breadboard. Placing the D1-mini on 2 separate rails.
Place the BME280 on proper distance from it.
Put the OLED in the opposite direction of the BME280.
Now, put them together.
Check all the connections:
- D1 pin to SCK pin on the OLED and SCL pin on the BME280
- D2 pin to SDA pin on the OLED and SDA pin on the BME280
- G pin to GND pin on both, the OLED and BME280
- 3.3V pin to BME280 VCC pin
- And finally 5V pin to OLED VCC
Check your contacts before connecting to computer and uploading the code!
Step 3: IoT Part
Download the Blynk app FROM AppStore. Open it and sign up. Create a new project. You can use any name of it. Set the device option to ESP8266 and the contact type to WiFi. Then creates a project. You should receive a confirmation email. And go back into the Blynk App project workspace. Now jump into the code (download link below) and change the highlights. Next, blink back to the project workspace, tap on the screen to open the widget box. Now tap on them and place a value box with 3 labels, first tap on it and name it to filter them. I call it temperature (it doesn’t have to be, but it makes everything easier and more organized). Select Virtual PIN1 as the input and type the label section “” C “(Figure 4). Set the label for other values.
Read Full Post