Get the best night’s sleep by using Alexa and Arduino to monitor the conditions in your bedroom, make suggestions and help you sleep better.

Things used in this project
Hardware components |
||||||
|
× | 1 | ||||
|
× | 1 | ||||
|
× | 1 | ||||
|
× | 1 | ||||
|
× | 1 | ||||
|
× | 1 | ||||
|
× | 1 | ||||
Software apps and online services |
||||||
|
||||||
|
||||||
|
||||||
|
||||||
|
||||||
Story
Demo
Introduction and Idea
Everyone deserves a good night’s sleep. Without good sleep, it’s difficult to function at full speed and face the day ahead. A restless night can happen for many reasons, and it’s hard to diagnose. That’s where Good Sleep comes in.
With Good Sleep, I paired a WiFi Arduino-powered monitoring system that tracks the qualities in a bedroom environment that are essential to sleep well, the temperature, humidity, light and sound levels, with an Alexa skill that interprets the data. Alexa will offer suggestions for how to improve your sleep and produces graphs so you can see how the environment in your room changes over the night.
Before you go to bed, check in with Alexa and she’ll tell you if the room is ready to go, or what needs to change for the perfect night’s sleep.
If you remember waking up in the night but aren’t sure why, then check the graphs and find out if the room became too cold, there was a loud noise outside or maybe there was too much light leaking through your curtains.
Building the Device
Final circuit board layout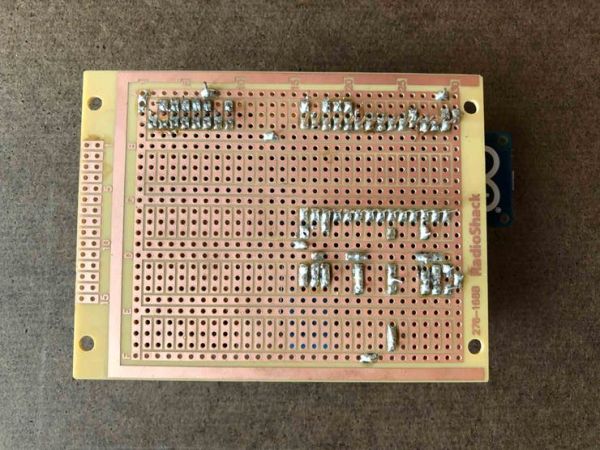
Circuit board reverse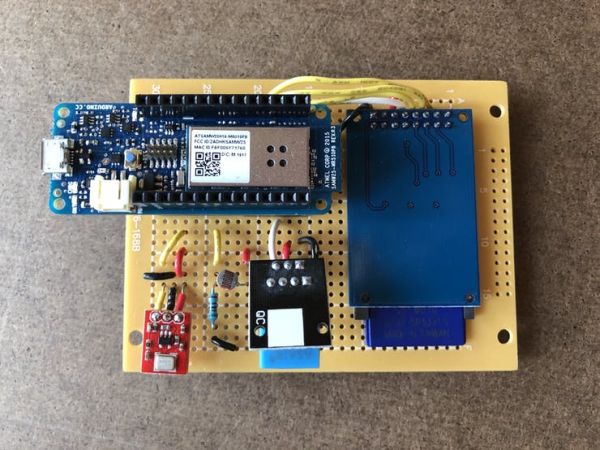
Birds eye view of the circuit
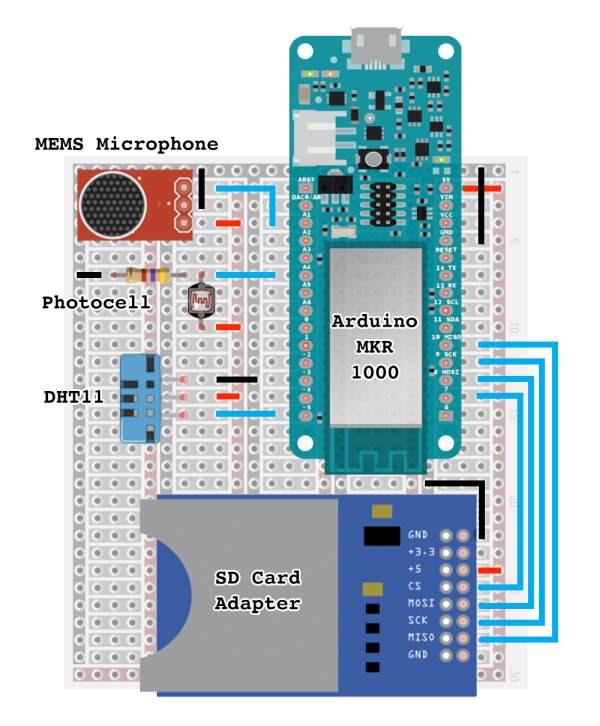
I decided upon the Arduino MKR1000 to power this project due to its built-in WiFi capability and a large number of GPIO pins for a reasonable cost. The WiFi chip enables the device to run its own access point as well as connect to existing networks, and it comes with the comprehensive WiFi101 library that also allows access to the realtime clock.
I combined this with the DHT11, an all-in-one chip for temperature and humidity, the SparkFun MEMS Microphone for audio detection and a photocell to detect light levels.
Finally, I added an SD card adapter for Arduino for the storage solution.
Making a Great Initial Experience
This project brings together a number of moving parts to create something very easy for an end user to plug in and get started with immediately.
The first time the Good Sleep device is plugged in, it creates a wireless network called “Sleep Monitor”.
The user connects to that network, selects their home WiFi and enters the password. The device is now set up, and gives them a 4-digit pin to remember.
Then, on their Amazon Echo device, they access the skill with “Alexa, open Good Sleep”. Alexa asks for the 4-digit pin, and that’s it! The device is now connected to Alexa and starts monitoring the room.
Technical Challenges: Linking Your Device to Alexa
To create such a simple startup experience, I needed a way to easily enable Alexa to pull data directly from the Arduino device.
- First I created WiFi management code on the Arduino MKR1000 that allows a user to specify their WiFi network details by connecting to an access point the device creates.
- Once the device is online, it runs a web server which uses UPnP to open a port and allow access to monitoring data from an outside service.
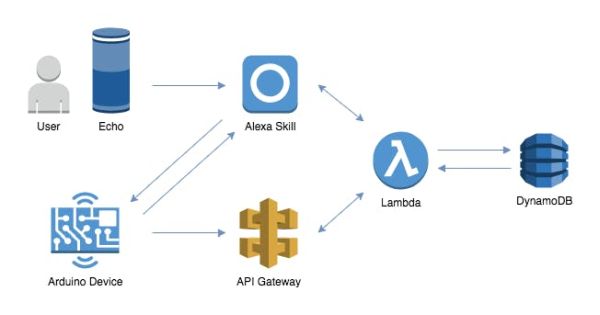
- The device generates a GUID and PIN number and sends it along with the network’s public IP address to the link service.
- The link service, powered by Amazon’s API Gateway, Lambda and DynamoDB, stores the GUID, PIN and associated IP address.
- When Alexa receives a user’s PIN, the matching GUID is retrieved from DynamoDB and stored with the Alexa user data so that the IP address of the device can be accessed at any point onwards.
Technical Challenges: Producing Charts in Realtime with Alexa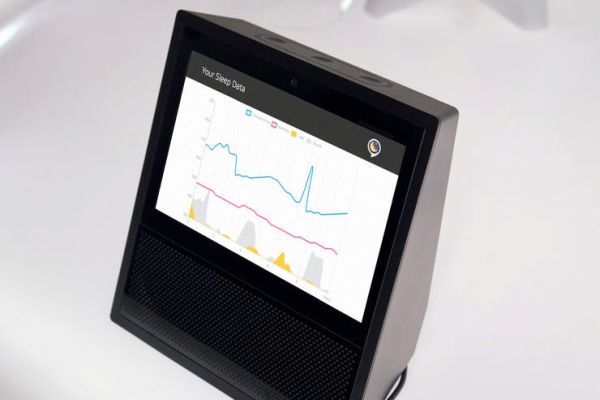
Realtime Charts in Action on the Echo Show
To show users statistics about their environment in a visual way, I needed a way to produce charts that render in a very short period of time so Alexa can respond in a timely fashion.
At first, I considered using PhantomJs to generate charts in the same Lambda function as Alexa’s skill response. However, this could lead to response times of greater than 10 seconds due to the overhead of PhantomJs.
Instead I decided to separate out the Alexa service from the chart generation service. When a chart is needed for a response, Alexa retrieves the data and simply generates a URL for the chart service. This makes the Alexa response very fast.
The generation service is a Lambda function that is accessed through an Amazon API Gateway resource. When either an Echo device with a screen or the Alexa mobile app requests the chart URL, the generation service uses a version of node-canvas compiled for AWS and the Javascript library Chart.js to output a PNG on the fly.
A chart can be drawn with many points of temperature, humidity, sound and light level data in about a second!
Technical Challenges: Storing Accurate Sensor Data

I wanted to allow direct access to the readings from the Alexa service because this allows the user to own their own data without reliance on a third party server and doesn’t incur any server storage costs.
To do this I added an SD card module to my design. Using the Arduino EDB library, I create a database for the sensor readings. To keep to a reasonable database size, I decided to record datapoints every 5 minutes which provides a granularity that is good enough to see trends over time. This is also an appropriate amount of data to pass back to Alexa for charts and summaries when requested.
It was important to ensure that the data was timestamped correctly. Each time the device turns on, a request is made to a NTP time server which get an accurate current time. I then took advantage of the realtime clock on the MKR1000, with the RTCZero library, so that each reading’s timestamp would remain accurate.
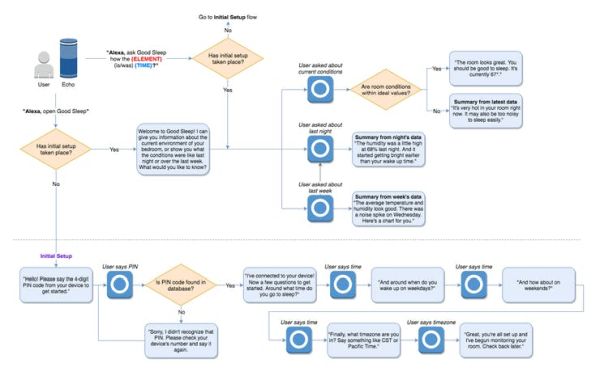
Voice User Interface (VUI)
The Alexa skill first takes users along an initial setup path if it is their first time, gathering useful information about their sleep habits.
From then on, Alexa can be asked about current and previous conditions and respond with informative summaries and graphs.
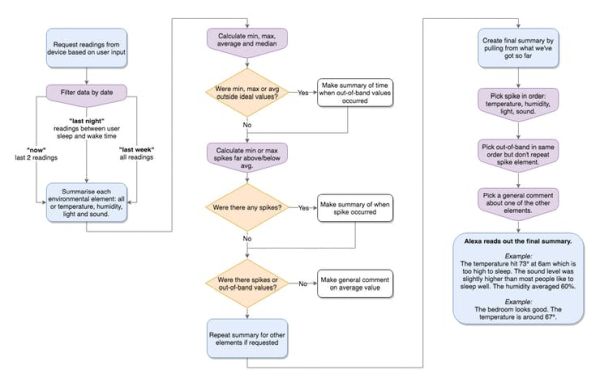
VUI Usability Challenges: Summarising the Data
I wanted Alexa to be able to look at the recorded readings over time and be able to produce useful suggestions and summaries.
There are four pieces of data: temperature, humidity, light and sound levels. First, I created bands for each data type of what were ideal sleeping temperatures and humidities then slightly too high, too low etc.
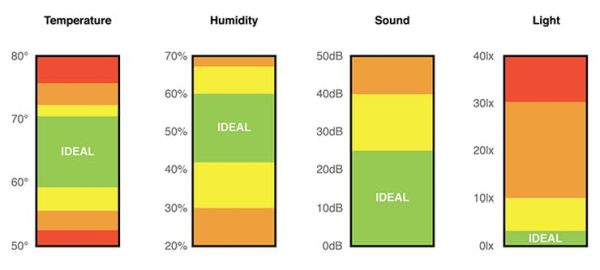
Taking the minimum, maximum, average and median of the readings let me judge whether there were any high or low spikes that were far from the average.
Combining these two sets of information: the ideal bands summary along with any big spikes lets Alexa intelligently comment without providing an overwhelming amount of detail.
Service Setup
There are a number of different services from AWS that require setup for this project. Screenshots and instructions for each are available on the project’s GitHub:
The Alexa skill is published in the Amazon skills store, and can be used by building your own version of the Arduino device without having to set up your own Lambda functions or API Gateway services.
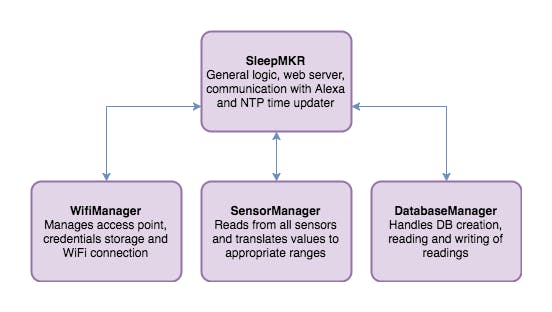
Software Design
All parts of the Arduino code, Alexa service and Lambda code are fully commented and available in this repository. You can see a summary of the main Arduino classes in the image below:
 Read more: