This is a project for Arduino to make a Thermometer with Digital Display, aimed at beginners.
Arduino measures the voltage on a TMP36 Temperature sensor, converts the Voltage to Degrees Celcius and Displays the value on an LOL shield display.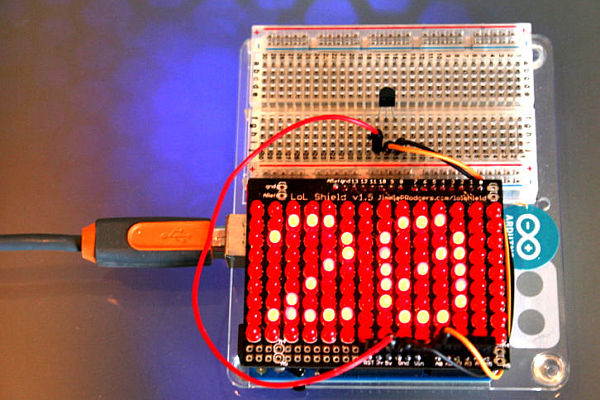
Objectives:
* Learn how to use the TMP36
* Learn how to perform numeric and string conversions in Arduino-C (sketch)
* Learn how to display numbers on the LOL shield
Step 2: Wire it up
Wire the TMP36 as follows:
+5V
GND
SIG => A0
Note: The LOL shield does not come with Headers (as shown in the picture), attached to the topside.
I bought some here: http://www.amazon.co.uk/gp/product/B004RASBVY/ref=oh_details_o06_s00_i00
Step 3: Install the LOL Shield Libraries
http://jimmieprodgers.com/kits/lolshield/
Step 4: Let’s Start by Reading the Temperature
We’ll start by reading the temperature from the TMP36 and sending the value to the Serial Monitor (Tools -> Serial Monitor on the Arduino IDE).
The TMP36 outputs a voltage on the SIG pin proportional to temperature.
Zero degrees Celcius = 500mV (0.5)
Each degree above that = 10mV (1/100)
Here’s a code segment:
float temperature = getVoltage(A0); // Get the voltage reading
temperature = (temperature – .5) * 100; // Convert to Temperature (degrees C)
Step 5: Here’s the Full Temperature Reading Code
* Displays Temperature from TMP36 numerically on an LOL shield
* Adapted from (and for more details on this circuit): http://tinyurl.com/c89tvd
*///TMP36 Pin Variables
int temperaturePin = 0; //the analog pin the TMP36’s Vout (sense) pin is connected to
//the resolution is 10 mV / degree centigrade
//(500 mV offset) i.e. 0 degrees = 500mV
/*
* setup() – this function runs once when you turn your Arduino on
* We initialize the serial connection with the computer
*/
void setup()
{
Serial.begin(9600); //Start the serial connection with the computer
}
void loop() // run over and over again
{
float temperature = getVoltage(temperaturePin); // Get the Voltage reading from the tem
perature sensor
temperature = (temperature – .5) * 100; // Convert from 10 mv per degree with 500mV offsetSerial.println(temperature); // Print the result
delay(1000); // Wait a second
}
/*
* getVoltage() – returns the voltage on the analog input defined by
* pin
*/
float getVoltage(int pin){
return (analogRead(pin) * 5.0/1024); //converting from a 0 to 1023 digital range
// to 0 to 5 volts (each 1 reading equals ~ 5 mV)
}
Step 6: How to Use the Display
#include “Myfont.h”You need to initialise the display in the Setup section:
void setup()
{
LedSign::Init();
}
and Draw the relevant digit in the Loop section:
Myfont::Draw(x_pos, ‘a’); // Send a character to the LOL shield
where x_pos is an int holding the x position where you want the number to be display (zero is the left hand edge).
In the final code you will need to convert the temperature reading (a float). To a char so that it can be displayed on the LOL shield using the Draw command.
To do this we use ltoa in C as follows:
temperature = (temperature – .5) * 100; // Convert to Temperature (a float)
ltoa(long(temperature), buffer, 10); // buffer is a 12 location char i.e. char buffer[12];
for (int i=0; i<2; i++) { // Iterate through the buffer for 2 characters
Myfont::Draw(1 + i*6,buffer[i]); // Send each character to the LOL shield
}